Overview
The core idea of Monkeys With Assemblers is to write some software that can auto-generate assembly code which can hopefully perform a set of *very* basic predefined tasks. It’s loosely based on the Infinite Monkey Theorem, partly because it allowed me to come up with a cool title, but mostly because I’m curious what will happen if I somewhat randomly throw together sequences of instructions and run them on a simple virtual machine.
I wanted to take a break from game/AR/sim projects and focus on something more technical. This is a good chance to brush up on basic computing knowledge and dust off the ol’ C++ for some good old fashioned optimisation.
Disclaimer: I would bet money that something like this already exists and I’m aware that there’s no shortage of excellent research into auto-generated code but, for now, ignorance is bliss. I want to discover things myself and learn from my inevitable mistakes. Reading comes later.
Anyway, enough waffle, let’s do it!
Basic Components
I’m going to build almost everything from scratch. This project is intended to be a learning experience and I find that building things from the ground up is a great way to really understand the fundamentals.
So, I figure we’re going to need:
- Instruction set : the language that our monkeys will work with
- Virtual Machine : runs programs built from the above instruction set
- VM Visualization : a visual interface for the VM so we can view its state
- Monkeys : some kind of code generator that will write, launch and evaluate programs on a massive scale
- Exercises : a way to define a task and evaluate whether a program has succeeded in performing that task
This is a ridiculous idea, I can’t wait! To prototype things quickly I’m going to start with C#, then port the performance critical components to C++ later.
So, let’s start by building a basic virtual machine…
Virtual Machine
We only require a very simple machine. We’ll base it very loosely on an ARM system because it’s so popular and is also used by a lot of hobbyists. As a result, the assembly code should look somewhat familiar to many people. It’s going to require, as a bare minimum:
- a small 32 bit instruction set (see below), loosely based on a subset of ARM instructions
- A number of 16 bit registers. We’ll start with two but can easily add more later.
- A program counter, possibly mapped to a register, and some conditional flags to handle comparisons.
- A customizable amount of RAM
- For now, a separate memory area to store a program
- The ability to execute programs and handle errors gracefully. There will be so many errors.
For now, I’m not going to add the concept of a stack or any other high level concepts. If a problem requires temporary storage of information or subroutines or something then our many monkeys will figure out a way to implement those, right???
Instruction Set
Let’s start with a basic set of instructions : Load, Store, Add, Subtract, Compare and Branch. We’ll have to consider registers, memory addresses and values so the initial set looks something like this:
	public enum OpCode
	{
		LOAD_VALUE = 0,
		LOAD_REGISTER,
		LOAD_MEMORY,
		STORE_REGISTER,
		STORE_MEMORY,
		COMPARE_VALUE,
		COMPARE_REGISTER,
		BRANCH_EQUAL,
		BRANCH_LESSTHAN,
		BRANCH_GREATERTHAN,
		BRANCH_ALWAYS,
		ADD_VALUE,
		ADD_REGISTER,
		SUBTRACT_VALUE,
		SUBTRACT_REGISTER,
		NOOP,
		NumInstructions = NOOP + 1
	}
Instructions comprise of an opcode, an optional register and an optional operand which could represent a register, memory address or value. These will be encoded into a 32 bit instruction, but there’s actually no practical requirement for that just yet so we’ll put it on the ‘optimisation’ pile for later, probably when we port the VM to C++.
Here’s what the initial basic instruction set definition looks like, still very WIP:
public InstructionSet()
{
	// Create a simple instruction set
	_instructionDefinitions = new InstructionDefinition[(int)OpCode.NumInstructions];
	_instructionDefinitions[(int)OpCode.LOAD_VALUE] = new InstructionDefinition(OpCode.LOAD_VALUE, OperandType.Register, OperandType.Value, "LDR");
	_instructionDefinitions[(int)OpCode.LOAD_REGISTER] = new InstructionDefinition(OpCode.LOAD_REGISTER, OperandType.Register, OperandType.Register, "LDR");
	_instructionDefinitions[(int)OpCode.LOAD_MEMORY] = new InstructionDefinition(OpCode.LOAD_MEMORY, OperandType.Register, OperandType.Address, "LDR");
	_instructionDefinitions[(int)OpCode.STORE_REGISTER] = new InstructionDefinition(OpCode.STORE_REGISTER, OperandType.Register, OperandType.Register, "STR");
	_instructionDefinitions[(int)OpCode.STORE_MEMORY] = new InstructionDefinition(OpCode.STORE_MEMORY, OperandType.Register, OperandType.Address, "STR");
	_instructionDefinitions[(int)OpCode.COMPARE_VALUE] = new InstructionDefinition(OpCode.COMPARE_VALUE, OperandType.Register, OperandType.Value, "CMP");
	_instructionDefinitions[(int)OpCode.COMPARE_REGISTER] = new InstructionDefinition(OpCode.COMPARE_REGISTER, OperandType.Register, OperandType.Register, "CMP");
	_instructionDefinitions[(int)OpCode.BRANCH_EQUAL] = new InstructionDefinition(OpCode.BRANCH_EQUAL, OperandType.Address, OperandType.Unused, "BEQ");
	_instructionDefinitions[(int)OpCode.BRANCH_LESSTHAN] = new InstructionDefinition(OpCode.BRANCH_LESSTHAN, OperandType.Address, OperandType.Unused, "BLT");
	_instructionDefinitions[(int)OpCode.BRANCH_GREATERTHAN] = new InstructionDefinition(OpCode.BRANCH_GREATERTHAN, OperandType.Address, OperandType.Unused, "BGT");
	_instructionDefinitions[(int)OpCode.BRANCH_ALWAYS] = new InstructionDefinition(OpCode.BRANCH_ALWAYS, OperandType.Address, OperandType.Unused, "B");
	_instructionDefinitions[(int)OpCode.ADD_VALUE] = new InstructionDefinition(OpCode.ADD_VALUE, OperandType.Register, OperandType.Value, "ADD");
	_instructionDefinitions[(int)OpCode.ADD_REGISTER] = new InstructionDefinition(OpCode.ADD_REGISTER, OperandType.Register, OperandType.Register, "ADD");
	_instructionDefinitions[(int)OpCode.SUBTRACT_VALUE] = new InstructionDefinition(OpCode.SUBTRACT_VALUE, OperandType.Register, OperandType.Value, "SUB");
	_instructionDefinitions[(int)OpCode.SUBTRACT_REGISTER] = new InstructionDefinition(OpCode.SUBTRACT_REGISTER, OperandType.Register, OperandType.Register, "SUB");
	_instructionDefinitions[(int)OpCode.NOOP] = new InstructionDefinition(OpCode.NOOP, OperandType.Unused, OperandType.Unused, "NOP");
}
By defining it in this way we can easily add or remove instructions depending on our needs. At some point it would be handy to define the instruction set and other VM parameters using a config file.
We’re obviously missing a lot of instructions but it’s already a bit complex for our initial tests. At some point I want to add a ‘store instruction’ instruction which will write a new instruction to a memory address, essentially allowing the code to write code which writes code, but that’s a subject for another day!
Programs
For now, our program is nothing more than a list of instructions. The VM will execute them one at a time, using a basic program counter to track the next instruction and handle branches. There will be a giant switch statement and I’m happy with that.
Our experiment doesn’t require us to write our own programs, but to test the VM I figured we’d need a way to hard code some basic ones:
// Create some instructions to run
Instruction[] instructions = new Instruction[]
{
	new Instruction(OpCode.LOAD_VALUE, Register.R0, 1),
	new Instruction(OpCode.STORE_MEMORY, Register.R0, 0)
};


// Create a program with our instructions
_program = new Program(instructions);
It’s a weird and insanely inefficient way to code, but it works. This masterpiece loads the value 1 into memory address 0. That’s it. It’s not Shakespeare but I think this will be a good initial challenge for our monkeys.
Disassembler
There’s no need for an assembler at this point. The system will write code by creating instructions directly so there’s no need for that code to be human-readable at source or for it to be assembled.
We do, however, want to read the results produced by our hard-working monkeys so we’ve included some data in the instruction definition so that it can construct a disassembled version of itself.
It’s a bit hacky, but it’s simple and gives us quick results.
VM Visualisation
It would be useful to view the state of a virtual machine at any time, including the memory contents, register/PC/flag states and the loaded instructions.
I’m not a command line fan, I want something visual but simple, so I’ve gone with a quick and dirty WPF approach in Windows because, meh, why not.
I don’t want to spend too much time on this aspect of the project so I cheated and used Derek Tremblay’s rather handy WPF Hex Editor component to display the memory contents. It has a bunch of useful features which I think will come in useful as the VM and the exercises become more complex.
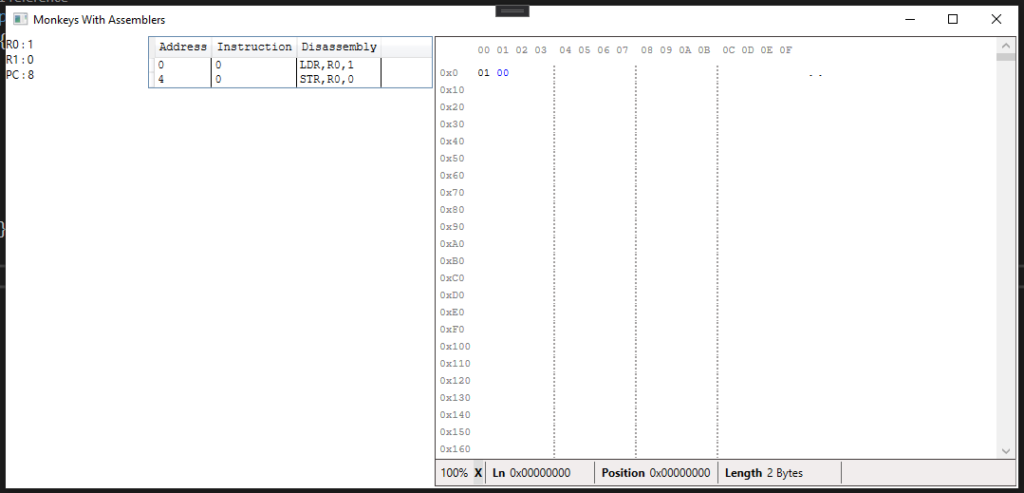
It Runs!
So, after a couple of days of weirdly enjoyable coding….voila! Below we have the visualisation of the virtual machine after it ran our simple program. We see that register 1 contains our value 1 and that the program counter ended at address 8, there’s a disassembly of the loaded program and the state of our tiny two bytes of memory with address 0 successfully containing the value 1. It’s a ridiculously simple example but there’s already enough code in there to scale this up to something much more complex.
What Next?
We’ve built the foundations, next we need to auto-generate some code. I’m not really sure what to expect. I deliberately avoided trying to determine the complexity of the problem and for all I know it could fall at the first hurdle due to it being a computational nightmare. I guess we’ll see! If it all goes to crap I might just have some fun building a fake computer instead.
NOOP!
Also, do the monkeys have names?
NOOP TO YOU! They don’t have names yet, but I’m starting to think that they should.